

What does moving a store mean?
Localhost is your own computer acting as a web server. You build the store there in private. Moving means copying two things to your host: the files and the database. A database is where the shop keeps products, orders and customers.
Magento is a big program. Ask Hostvento support if your plan can run it. Magento needs good memory and a recent PHP version. SSH access helps a lot. SSH is a safe way to type commands on your server.
Warning: Keep a copy of your local store. Never work on your only copy.
Steps
Part 1: Prepare your local store
- Clear the cache. In the Magento folder, run:
php bin/magento cache:cleanThis removes temporary saved data.
- Zip the whole Magento folder. You may skip the
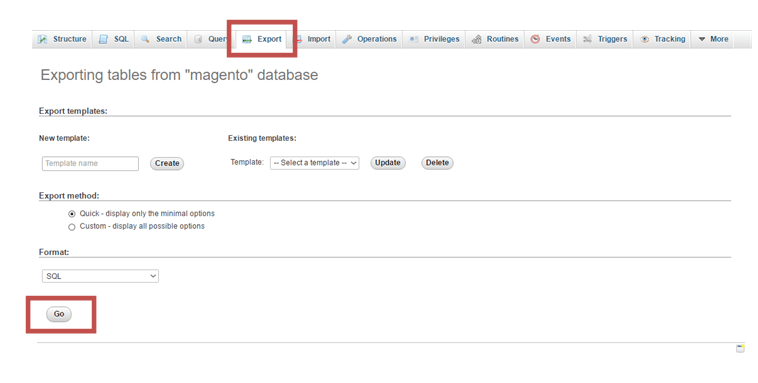
varandgeneratedfolders to keep it small. - Export the database with phpMyAdmin. Click your database, then Export, then Go.
Part 2: Upload to the server
- In cPanel, open MySQL Databases and create a database and a user. Give All Privileges.
- Open File Manager, go to
public_html, upload your ZIP and extract it. - Open phpMyAdmin, pick the new database, click Import and select your
.sqlfile.
Part 3: Fix the settings
- Open
app/etc/env.phpwith File Manager. Update thedbsection with the new database name, user and password. - In phpMyAdmin, open the table
core_config_data. - Find the rows with the paths
web/unsecure/base_urlandweb/secure/base_url.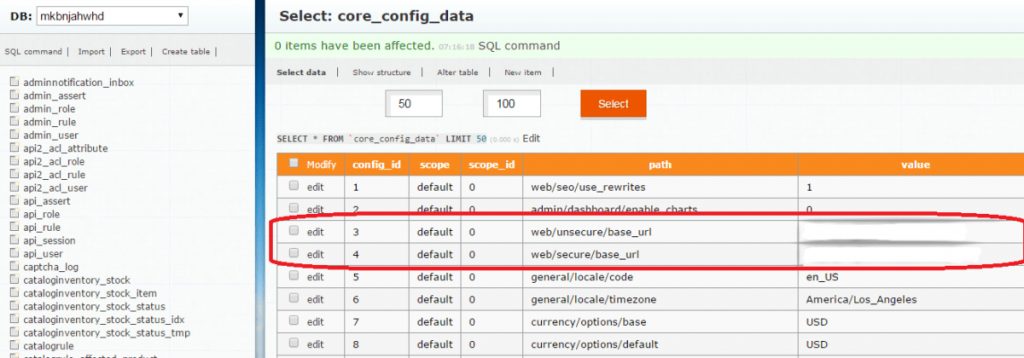
- Change them to your live address, for example
https://yourdomain.com/. Keep the slash at the end.
Part 4: Finish up
- If you have SSH, go to your Magento folder and run:
php bin/magento setup:upgrade
php bin/magento cache:flush
The first line updates the database parts. The second clears the cache again.
- Set folder rights as Magento advises, usually folders
755and files644. - Open your domain and test the shop, the cart and checkout.
Tip: If pages show errors, ask Hostvento support to check the PHP version and memory limit. Also read the log files in
var/log.Quick recap
- Copy two things: files and database.
- Create a new database and update
app/etc/env.php. - Change the base URLs in
core_config_data. - Run
setup:upgradeand flush the cache. - Test the shop before you announce it.