
Why contact details matter
WHM and cPanel send emails about problems. These include full disk space, failed backups and security alerts. If the email address is old, nobody sees these notices. There are two places with contact details. One is for the server. The other is for each account.
Part 1: Change the server contact email
You need root access for this part. Root is the main admin login of a server.
- Log in to WHM as root.
- Type Basic WebHost Manager Setup in the search box. In newer versions the name is Basic cPanel & WHM Setup.
- Open it and find Server Contact Email Address.
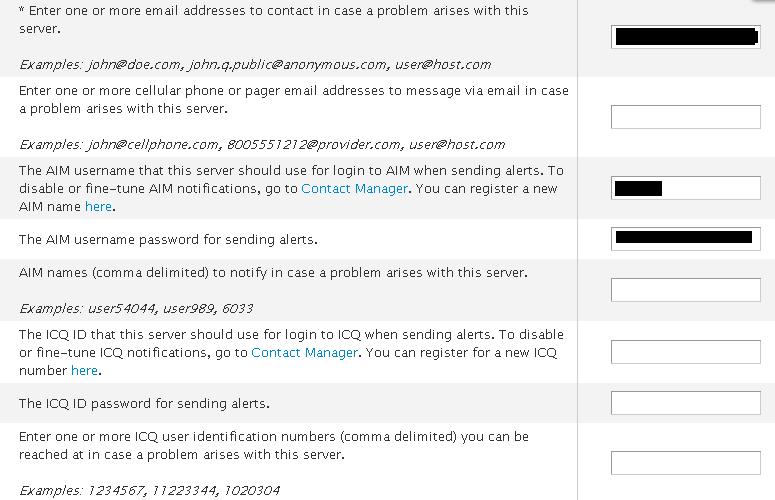
- Type the new email address. You can add a second one if the page has a second box.
- Scroll down and click Save Changes.
Part 2: Change notification settings
- In the search box type Contact Manager.
- Open it.
- Choose which events send an email, and in what way.
- Click Save.
Part 3: Change the contact email of one account
- Search for Modify an Account and open it.
- Select the account.
- Click Modify or Select.
- Find Contact Email in the list of settings.
- Type the new address.
- Scroll down and click Save.
The owner can also change it in their own cPanel. They open Contact Information or Preferences and update the address there.
Test it
After you save, ask yourself if the address is spelled correctly. A single wrong letter sends alerts to a stranger. Some versions of Contact Manager have a test button. If yours does, use it.
Your Hostvento billing contact
Your billing and support details for Hostvento are separate from WHM. You change them in the client area at https://secure.hostvento.com/clientarea.php.
Quick recap
- The server contact email is set in the basic setup page.
- Contact Manager chooses which alerts are sent.
- Each account has its own contact email in Modify an Account.
- Check spelling after you save.